

taibeihacker
Moderator
0x00 MHN蜜罐介绍MHN(Modern Honey Network):開源蜜罐,簡化蜜罐的部署,同時便於收集和統計蜜罐的數據。用ThreatStream來部署,數據存儲在MOngoDB中,安裝了入侵檢測系統的部署傳感器Snort、Kippo、Conpot和Dionaea。收集的信息可以通過Web接口進行展示。據官方說法,目前經測試支持部署MHN服務器的系統有Ubuntu 14.04, Ubuntu 16.04, Centos 6.9
github地址(https://github.com/threatstream/mh)
0x01 支持蜜罐类型Snort
Suricata
Dionaea
Conpot
Kippo
Amun
Glastopf
WordPot
ShaockPot
P0f
0x02 MHN架构

0x03 MHN安装与使用1.Ubuntu安装MHN管理端# 操作系統:ubuntu16.04系統更新和自動化腳本安裝
sudo apt update
sudo apt upgrade -y
sudo apt-get install git -y
cd /opt
sudo git clone https://github.com/threatstream/mhn.git
cd mhn /
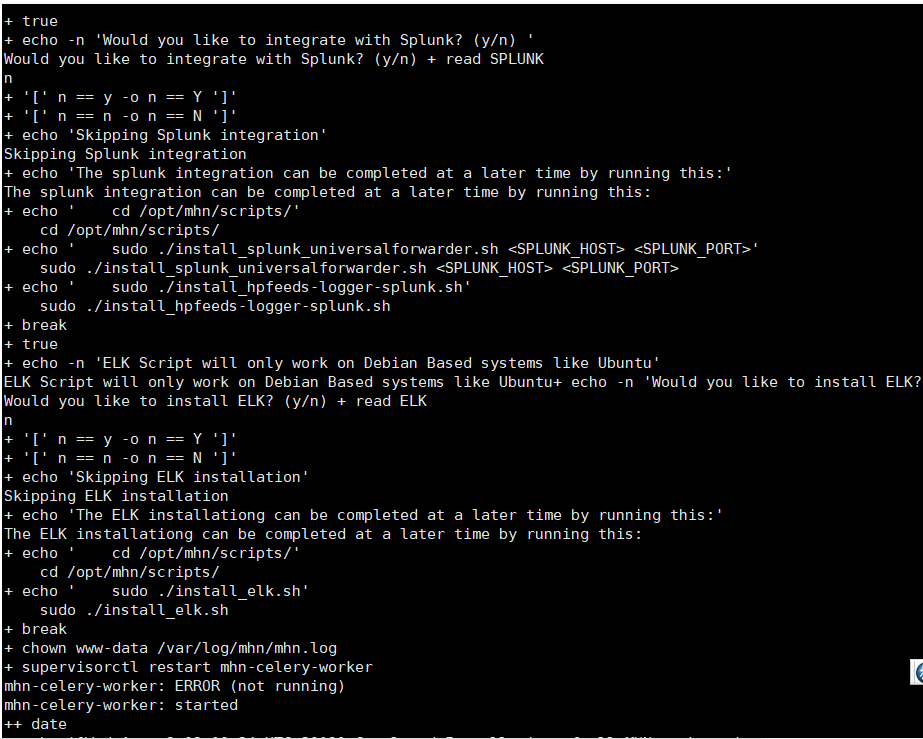
sudo ./install.sh
# 配置服務器信息,這裡的郵箱與密碼就是安裝完成後的Web後台密碼
Do you wish to run in Debug mode? y/n n
Superuser email: root@backlion.org
Superuser password: (again):
Server base url ['http://155.138.147.248']:
Honeymap url [':3000']: http://155.138.147.248:3000
Mail server address ['localhost']:
Mail server port [25]:
Use TLS for email? y/n n
Use SSL for email? y/n n
Mail server username ['']:
Mail server password ['']:
Mail default sender ['']:
Path for log file ['/var/log/mhn/mhn.log']:
Would you like to integrate with Splunk? (y/n)n
Would you like to install ELK? (y/n)n
# 配置splunk與ELK,我這裡選擇不配置
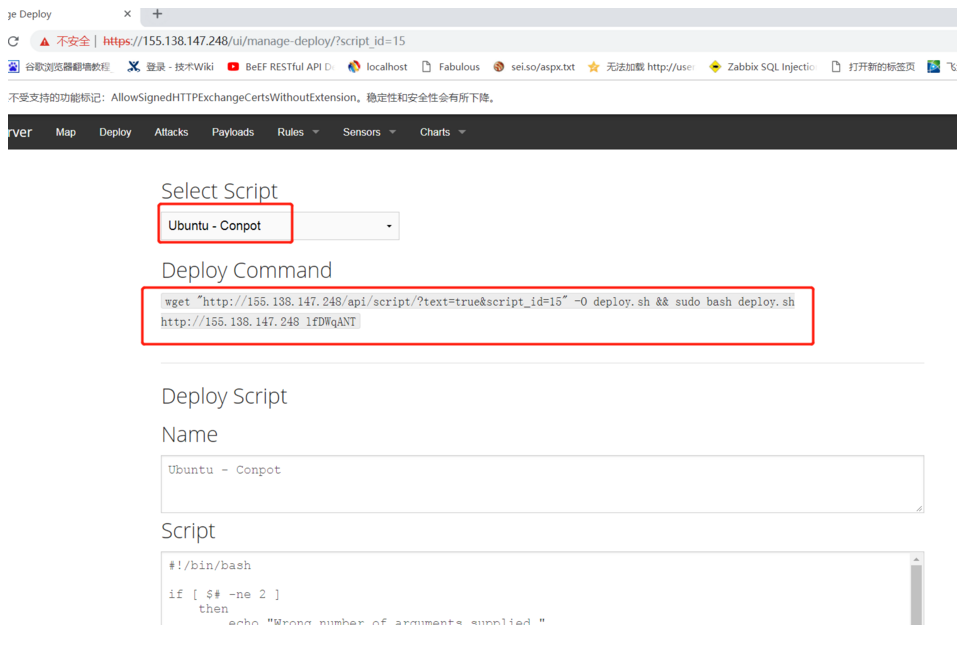
2.MHN配置2.1 agent部署蜜罐在Deploy選項中,選擇我們需要部署的蜜罐類型,複製部署腳本進行安裝。
如部署conpot蜜罐,在其係統中執行以下腳本:
wget 'http://155.138.147.248/api/script/?text=truescript_id=15' -O deploy.sh sudo bash deploy.sh http://155.138.147.248 lfDWqAN
2.2 集成Splunk与ArcSightSplunkcd /opt/mhn/scripts/
sudo ./install_hpfeeds-logger-splunk.sh
sudo ./install_splunk_universalforwarder.sh
tail -f /var/log/mhn/mhn-splunk.log
這會將事件作為值記錄到/var/log/mhn-splunk.log。 SplunkUniveralForwarder應該監視此日誌
Arcsightcd /opt/mhn/scripts/
sudo ./install_hpfeeds-logger-arcsight.sh
tail -f /var/log/mhn/mhn-arcsight.log
2.3禁止数据上报MHNServer會默認將分析數據上報給Anomali,如果需要禁用此配置,運行如下命令:
cd mhn/scripts/
sudo ./disable_collector.sh
3.利用MHN部署蜜罐SSH蜜罐测试# 蜜罐部署機器:155.138.151.176
# 部署蜜罐:dionaea
wget
'http://155.138.147.248/api/script/?text=truescript_id=4' -O
deploy.sh sudo bash deploy.sh http://155.138.147.248 lfDWqANT
# 嘗試暴力破解攻擊
hydra -l root -P password.txt mssql://155.138.151.176
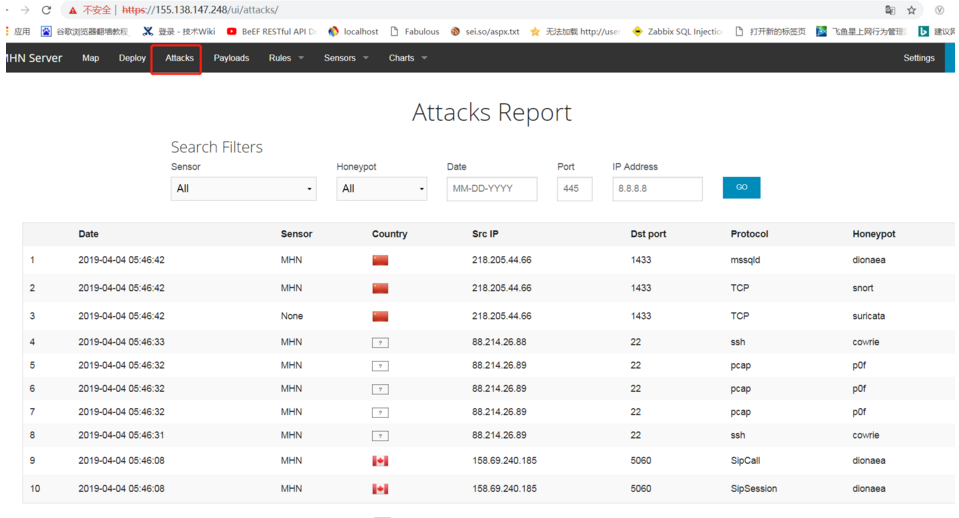
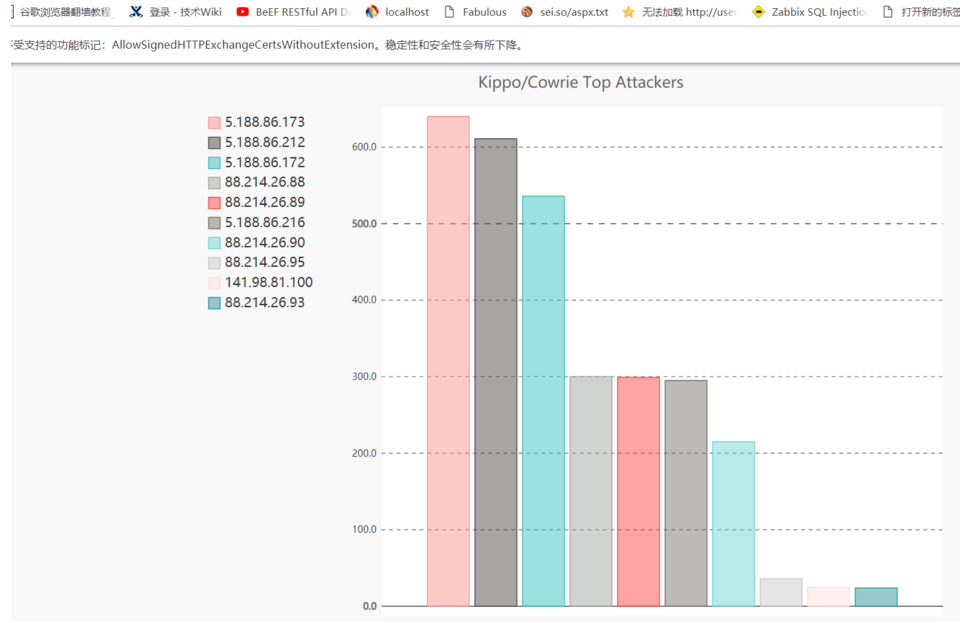
4.界面功能展示1.如下圖界面展示了攻擊者的源IP地址以及目的端口和所屬協議以及蜜罐類型等攻擊報告信息。
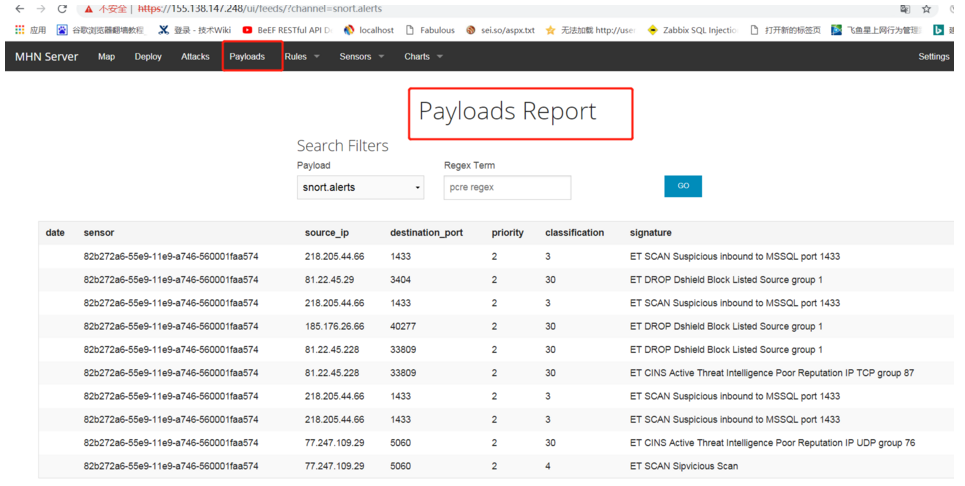
2.如下圖列出了攻擊載荷報告信息(傳感器,源IP地址,目的端口等信息)
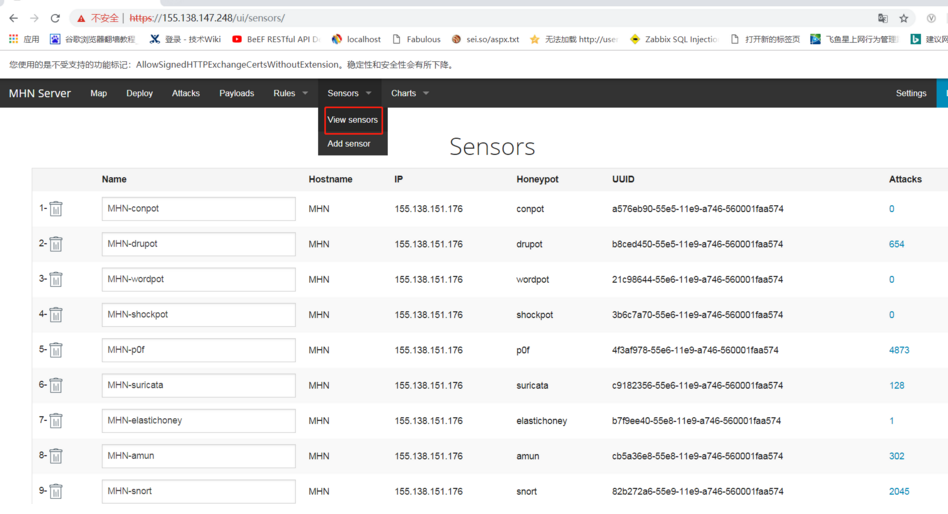
3.可以看到下圖列出了已安裝的agent傳感器
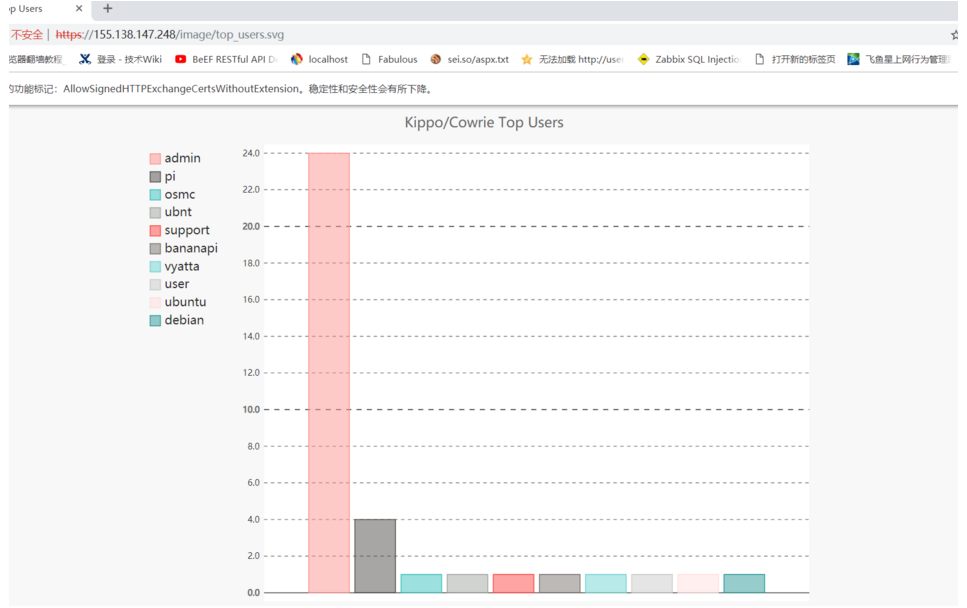
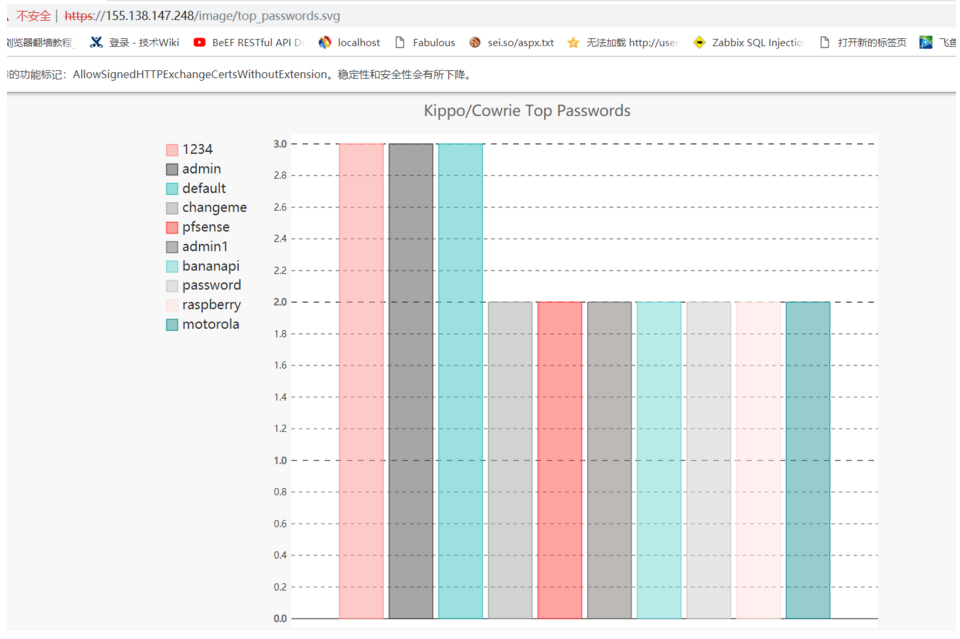
4.下圖分別列出攻擊者TOP的用戶名和密碼字典等展示圖
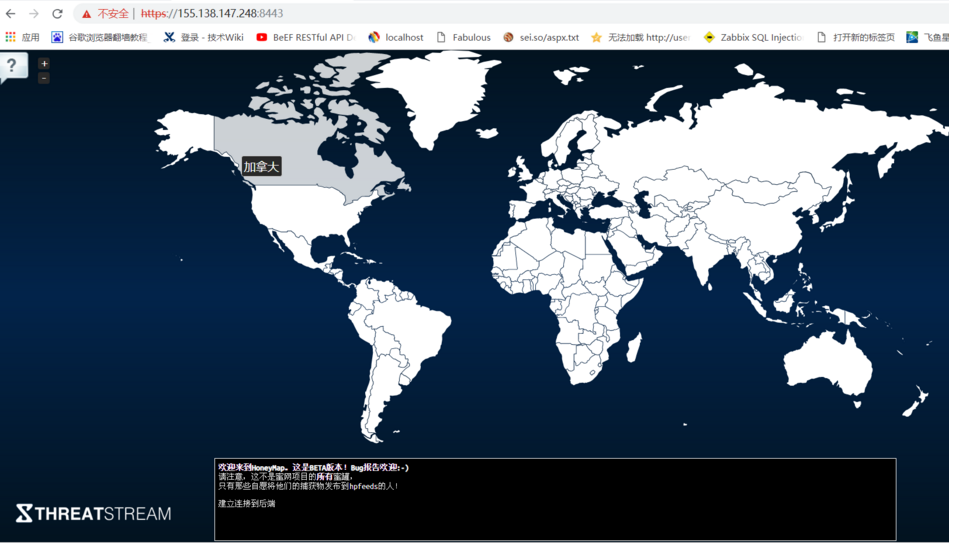
5.打開以下連接地址可以看到實時的攻擊圖(honeymap)
0x05 系统排错以及安全设置1.查看系统运行状态root@mhn:/opt/mhn/scripts# sudo /etc/init.d/nginx status #查看nginx狀態
* nginx is running
root@mhn:/opt/mhn/scripts# sudo /etc/init.d/supervisor status #查看supervisor 狀態
is running
root@mhn:/opt/mhn/scripts#sudo supervisorctl status #查看所有蜜罐系統組件運行狀態
geoloc RUNNING pid 31443, uptime 0:00:12
honeymap RUNNING pid 30826, uptime 0:08:54
hpfeeds-broker RUNNING pid 10089, uptime 0:36:42
mhn-celery-beat RUNNING pid 29909, uptime 0:18:41
mhn-celery-worker RUNNING pid 29910, uptime 0:18:41
mhn-collector RUNNING pid 7872, uptime 0:18:41
mhn-uwsgi RUNNING pid 29911, uptime 0:18:41
mnemosyne RUNNING pid 28173, uptime 0:30:08
root@mhn:/opt/mhn/scripts#sudo supervisorctl restart all #重啟所有蜜罐系組件系統命令
正常情況各服務的狀態如下:
geoloc RUNNING pid 31443, uptime 0:00:12
honeymap RUNNING pid 30826, uptime 0:08:54
hpfeeds-broker RUNNING pid 10089, uptime 0:36:42
mhn-celery-beat RUNNING pid 29909, uptime 0:18:41
mhn-celery-worker RUNNING pid 29910, uptime 0:18:41
mhn-collector RUNNING pid 7872, uptime 0:18:41
mhn-uwsgi RUNNING pid 29911, uptime 0:18:41
mnemosyne RUNNING pid 28173, uptime 0:30:08
2.honeymap 的状态为FATAL解决方法先刪除舊版本的golang
sudo rm -rf /usr/bin/go
sudo apt-get remove golang-go
sudo apt-get remove --auto-remove golang-go
安裝golang,如果apt-get install golang安裝,後面會因為golang版本低而報錯,所以直接下載編譯後的包
wget https://storage.googleapis.com/golang/go1.9.linux-amd64.tar.gz
解壓,然後進行以下配置
sudo tar -xzf go1.9.linux-amd64.tar.gz -C /usr//local///注意包名要改和自己一樣的
導入環境變量:
export GOROOT=/usr/local/go
export GOARCH=amd64
export GOOS=linux
export GOBIN=$GOROOT/bin/
export GOTOOLS=$GOROOT/pkg/tool/
export PATH=$GOBIN:$GOTOOLS:$PATH
安裝依賴插件net並重新啟動所有蜜罐系統組件
cd /opt/honeymap/server
export GOPATH=/opt/honeymap/server
mkdir -p $GOPATH/src/golang.org/x/
cd $GOPATH/src/golang.org/x/
git clone https://github.com/golang/net.git net
go install net
sudo supervisorctl restart all
3.mhn-celery-worker的状态为FATAL解决方法cd /var/log/mhn/
sudo chmod 777 mhn.log
sudo supervisorctl start mhn-celery-worker
如果還不行
cd /var/log/mhn/#查看celery-worker的錯誤日誌
tail -f mhn-celery-worker.err
提示的具體錯誤內容如下
worker.err supervisor: couldn't chdir to /root/mhn/server: EACCES supervisor: child process was not spawned)
改變root跟目錄權限
chmod 777 -R /root # 改下權限
4.手动密码重置如果基於電子郵件的密碼重置不適合您,這是另一種方法。
# cd /opt/mhn/server/server/
#apt install sqlite3
# sqlite3 mhn.db
SQLite version 3.7.9 2011-11-01 00:52:41
Enter '.help' for instructions
Enter SQL statements terminated with a ';'
sqlite select * from user;
1|USERNAME@SITE.com|sklfdjhkasdlfhklsadhfklasdhfkldsahklsd|1|
sqlite.quit
$ cd /opt/mhn/server/
$ source env/bin/activate
$ cd server
$ python manual_password_reset.py
Enter email address: YOUR_USER@YOUR_SITE.com
Enter new password:
Enter new password (again):
user found, updating password
5.网络排查$ sudo netstat -luntp #查看網絡端口開放情況
Active Internet connections (only servers)
Proto Recv-Q Send-Q Local Address Foreign Address State PID/Program name
tcp 0 0 0.0.0.0:22 0.0.0.0:* LISTEN 561/sshd
tcp6 0 0 :21 :* LISTEN 3763/dionaea
tcp6 0 0 :22 :* LISTEN 561/sshd
tcp6 0 0 :1433 :* LISTEN 3763/dionaea
tcp6 0 0 :443 :* LISTEN 3763/dionaea
tcp6 0 0 :445 :* LISTEN 3763/dionaea
tcp6 0 0 :5060 :* LISTEN 3763/dionaea
tcp6 0 0 :5061 :* LISTEN 3763/dionaea
tcp6 0 0 :135 :* LISTEN 3763/dionaea
tcp6 0 0 :3306 :* LISTEN 3763/dionaea
tcp6 0 0 :42 :* LISTEN 3763/dionaea
tcp6 0 0 :80 :* LISTEN 3763/dionaea
udp 0 0 0.0.0.0:68 0.0.0.0:* 464/dhclient3
udp 0 0 0.0.0.0:40077 0.0.0.0:* 3763/dionaea
udp6 0 0 :5060 :* 3763/dionaea
udp6 0 0 :69 :* 3763/dionaea
$ sudo iptables -L #查看防火牆規則狀態
Chain INPUT (policy ACCEPT)
target prot opt source destination
Chain FORWARD (policy ACCEPT)
target prot opt source destination
Chain OUTPUT (policy ACCEPT)
target prot opt source destination
$ sudo tcpdump -nnNN tcp port 10000 #監聽tcp 10000數據通信信息
tcpdump: verbose output suppressed, use -v or -vv for full protocol decode
listening on eth0, link-type EN10MB (Ethernet), capture size 65535 bytes
16:46:14.009646 IP 1.2.3.4.42873 5.6.6.8.10000: Flags [P.], seq 1180349317:1180349611, ack 2474834734, win 913, options [nop,nop,TS val 85084174 ecr 169636000], lengt
github地址(https://github.com/threatstream/mh)
0x01 支持蜜罐类型Snort
Suricata
Dionaea
Conpot
Kippo
Amun
Glastopf
WordPot
ShaockPot
P0f
0x02 MHN架构
0x03 MHN安装与使用1.Ubuntu安装MHN管理端# 操作系統:ubuntu16.04系統更新和自動化腳本安裝
sudo apt update
sudo apt upgrade -y
sudo apt-get install git -y
cd /opt
sudo git clone https://github.com/threatstream/mhn.git
cd mhn /
sudo ./install.sh
# 配置服務器信息,這裡的郵箱與密碼就是安裝完成後的Web後台密碼
Do you wish to run in Debug mode? y/n n
Superuser email: root@backlion.org
Superuser password: (again):
Server base url ['http://155.138.147.248']:
Honeymap url [':3000']: http://155.138.147.248:3000
Mail server address ['localhost']:
Mail server port [25]:
Use TLS for email? y/n n
Use SSL for email? y/n n
Mail server username ['']:
Mail server password ['']:
Mail default sender ['']:
Path for log file ['/var/log/mhn/mhn.log']:
Would you like to integrate with Splunk? (y/n)n
Would you like to install ELK? (y/n)n
# 配置splunk與ELK,我這裡選擇不配置
2.MHN配置2.1 agent部署蜜罐在Deploy選項中,選擇我們需要部署的蜜罐類型,複製部署腳本進行安裝。
如部署conpot蜜罐,在其係統中執行以下腳本:
wget 'http://155.138.147.248/api/script/?text=truescript_id=15' -O deploy.sh sudo bash deploy.sh http://155.138.147.248 lfDWqAN
2.2 集成Splunk与ArcSightSplunkcd /opt/mhn/scripts/
sudo ./install_hpfeeds-logger-splunk.sh
sudo ./install_splunk_universalforwarder.sh
tail -f /var/log/mhn/mhn-splunk.log
這會將事件作為值記錄到/var/log/mhn-splunk.log。 SplunkUniveralForwarder應該監視此日誌
Arcsightcd /opt/mhn/scripts/
sudo ./install_hpfeeds-logger-arcsight.sh
tail -f /var/log/mhn/mhn-arcsight.log
2.3禁止数据上报MHNServer會默認將分析數據上報給Anomali,如果需要禁用此配置,運行如下命令:
cd mhn/scripts/
sudo ./disable_collector.sh
3.利用MHN部署蜜罐SSH蜜罐测试# 蜜罐部署機器:155.138.151.176
# 部署蜜罐:dionaea
wget
'http://155.138.147.248/api/script/?text=truescript_id=4' -O
deploy.sh sudo bash deploy.sh http://155.138.147.248 lfDWqANT
# 嘗試暴力破解攻擊
hydra -l root -P password.txt mssql://155.138.151.176
4.界面功能展示1.如下圖界面展示了攻擊者的源IP地址以及目的端口和所屬協議以及蜜罐類型等攻擊報告信息。
2.如下圖列出了攻擊載荷報告信息(傳感器,源IP地址,目的端口等信息)
3.可以看到下圖列出了已安裝的agent傳感器
4.下圖分別列出攻擊者TOP的用戶名和密碼字典等展示圖
5.打開以下連接地址可以看到實時的攻擊圖(honeymap)
0x05 系统排错以及安全设置1.查看系统运行状态root@mhn:/opt/mhn/scripts# sudo /etc/init.d/nginx status #查看nginx狀態
* nginx is running
root@mhn:/opt/mhn/scripts# sudo /etc/init.d/supervisor status #查看supervisor 狀態
is running
root@mhn:/opt/mhn/scripts#sudo supervisorctl status #查看所有蜜罐系統組件運行狀態
geoloc RUNNING pid 31443, uptime 0:00:12
honeymap RUNNING pid 30826, uptime 0:08:54
hpfeeds-broker RUNNING pid 10089, uptime 0:36:42
mhn-celery-beat RUNNING pid 29909, uptime 0:18:41
mhn-celery-worker RUNNING pid 29910, uptime 0:18:41
mhn-collector RUNNING pid 7872, uptime 0:18:41
mhn-uwsgi RUNNING pid 29911, uptime 0:18:41
mnemosyne RUNNING pid 28173, uptime 0:30:08
root@mhn:/opt/mhn/scripts#sudo supervisorctl restart all #重啟所有蜜罐系組件系統命令
正常情況各服務的狀態如下:
geoloc RUNNING pid 31443, uptime 0:00:12
honeymap RUNNING pid 30826, uptime 0:08:54
hpfeeds-broker RUNNING pid 10089, uptime 0:36:42
mhn-celery-beat RUNNING pid 29909, uptime 0:18:41
mhn-celery-worker RUNNING pid 29910, uptime 0:18:41
mhn-collector RUNNING pid 7872, uptime 0:18:41
mhn-uwsgi RUNNING pid 29911, uptime 0:18:41
mnemosyne RUNNING pid 28173, uptime 0:30:08
2.honeymap 的状态为FATAL解决方法先刪除舊版本的golang
sudo rm -rf /usr/bin/go
sudo apt-get remove golang-go
sudo apt-get remove --auto-remove golang-go
安裝golang,如果apt-get install golang安裝,後面會因為golang版本低而報錯,所以直接下載編譯後的包
wget https://storage.googleapis.com/golang/go1.9.linux-amd64.tar.gz
解壓,然後進行以下配置
sudo tar -xzf go1.9.linux-amd64.tar.gz -C /usr//local///注意包名要改和自己一樣的
導入環境變量:
export GOROOT=/usr/local/go
export GOARCH=amd64
export GOOS=linux
export GOBIN=$GOROOT/bin/
export GOTOOLS=$GOROOT/pkg/tool/
export PATH=$GOBIN:$GOTOOLS:$PATH
安裝依賴插件net並重新啟動所有蜜罐系統組件
cd /opt/honeymap/server
export GOPATH=/opt/honeymap/server
mkdir -p $GOPATH/src/golang.org/x/
cd $GOPATH/src/golang.org/x/
git clone https://github.com/golang/net.git net
go install net
sudo supervisorctl restart all
3.mhn-celery-worker的状态为FATAL解决方法cd /var/log/mhn/
sudo chmod 777 mhn.log
sudo supervisorctl start mhn-celery-worker
如果還不行
cd /var/log/mhn/#查看celery-worker的錯誤日誌
tail -f mhn-celery-worker.err
提示的具體錯誤內容如下
worker.err supervisor: couldn't chdir to /root/mhn/server: EACCES supervisor: child process was not spawned)
改變root跟目錄權限
chmod 777 -R /root # 改下權限
4.手动密码重置如果基於電子郵件的密碼重置不適合您,這是另一種方法。
# cd /opt/mhn/server/server/
#apt install sqlite3
# sqlite3 mhn.db
SQLite version 3.7.9 2011-11-01 00:52:41
Enter '.help' for instructions
Enter SQL statements terminated with a ';'
sqlite select * from user;
1|USERNAME@SITE.com|sklfdjhkasdlfhklsadhfklasdhfkldsahklsd|1|
sqlite.quit
$ cd /opt/mhn/server/
$ source env/bin/activate
$ cd server
$ python manual_password_reset.py
Enter email address: YOUR_USER@YOUR_SITE.com
Enter new password:
Enter new password (again):
user found, updating password
5.网络排查$ sudo netstat -luntp #查看網絡端口開放情況
Active Internet connections (only servers)
Proto Recv-Q Send-Q Local Address Foreign Address State PID/Program name
tcp 0 0 0.0.0.0:22 0.0.0.0:* LISTEN 561/sshd
tcp6 0 0 :21 :* LISTEN 3763/dionaea
tcp6 0 0 :22 :* LISTEN 561/sshd
tcp6 0 0 :1433 :* LISTEN 3763/dionaea
tcp6 0 0 :443 :* LISTEN 3763/dionaea
tcp6 0 0 :445 :* LISTEN 3763/dionaea
tcp6 0 0 :5060 :* LISTEN 3763/dionaea
tcp6 0 0 :5061 :* LISTEN 3763/dionaea
tcp6 0 0 :135 :* LISTEN 3763/dionaea
tcp6 0 0 :3306 :* LISTEN 3763/dionaea
tcp6 0 0 :42 :* LISTEN 3763/dionaea
tcp6 0 0 :80 :* LISTEN 3763/dionaea
udp 0 0 0.0.0.0:68 0.0.0.0:* 464/dhclient3
udp 0 0 0.0.0.0:40077 0.0.0.0:* 3763/dionaea
udp6 0 0 :5060 :* 3763/dionaea
udp6 0 0 :69 :* 3763/dionaea
$ sudo iptables -L #查看防火牆規則狀態
Chain INPUT (policy ACCEPT)
target prot opt source destination
Chain FORWARD (policy ACCEPT)
target prot opt source destination
Chain OUTPUT (policy ACCEPT)
target prot opt source destination
$ sudo tcpdump -nnNN tcp port 10000 #監聽tcp 10000數據通信信息
tcpdump: verbose output suppressed, use -v or -vv for full protocol decode
listening on eth0, link-type EN10MB (Ethernet), capture size 65535 bytes
16:46:14.009646 IP 1.2.3.4.42873 5.6.6.8.10000: Flags [P.], seq 1180349317:1180349611, ack 2474834734, win 913, options [nop,nop,TS val 85084174 ecr 169636000], lengt